
by Hib Halverson
Engines with dry-sump oiling systems have been either optional or standard on Corvettes since 2006.
Note: this article does not cover the C8 Z06. When changing the oil and filter on the LT6 engine in a Z06, do not use the procedures listed in this article for a C8’s, LT2. A future revision to this article will add 2023-up Z06 oil/filter change instructions.
When a dry-sump engine is running, only a small amount of oil is in its oil pan, or “sump”, with a majority of the oil supply in a tank separate from the engine. One or more “scavenge” pumps suck oil from the sump and pump it to the oil tank. A “pressure pump” draws oil from the tank and pumps it through the filter and oil cooler to engine parts which are pressure lubricated.
Key advantages of dry-sump oiling are: 1) more consistent oil pressure when the engine is at high rpm and the car is maneuvering with high lateral acceleration and 2) far less oil aeration or “windage” caused by the spinning crankshaft and violent air movement between the cylinder block’s “bays” rapidly reciprocating piston movement.
Introduced on C6
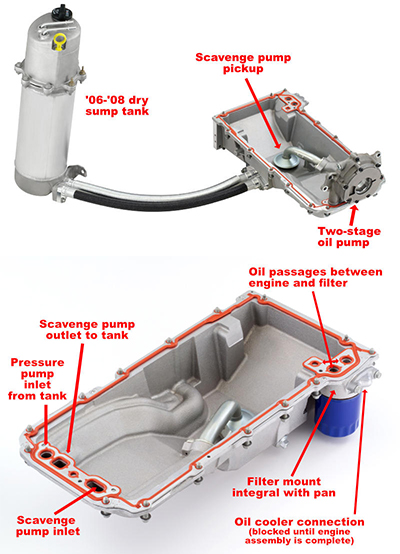
GM’s first production engine with a dry-sump system was introduced back in the C6 era on the 2006 ZO6’s LS7 “Gen4” Small-Block V8. The system used one scavenge pump and one pressure pump. The oil tank was on the left side of the firewall, behind the right front wheel well. Two hoses connected it to the engine.
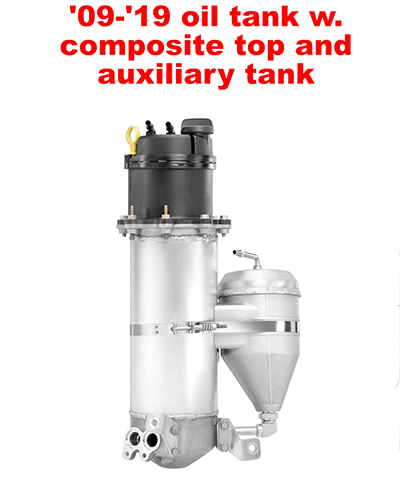
After introducing the dry-sump system for ’06, GM used it on the 2009 ZR1’s LS9. According to the Corvette Black Book (PN B-400), the oil tank capacity was also increased to support the piston oilers used to cool the supercharged engine’s pistons. All dry-sump engines, from ’09-’19, have that bigger tank.
Starting in 2010, GM offered RPO Z52 on Grand Sport Coupes with manual transmissions. Z52 was a performance package that added dry-sump oiling to the GS’s LS3, as well as a rear axle cooler and a rear-mounted battery.
Expanded for C7
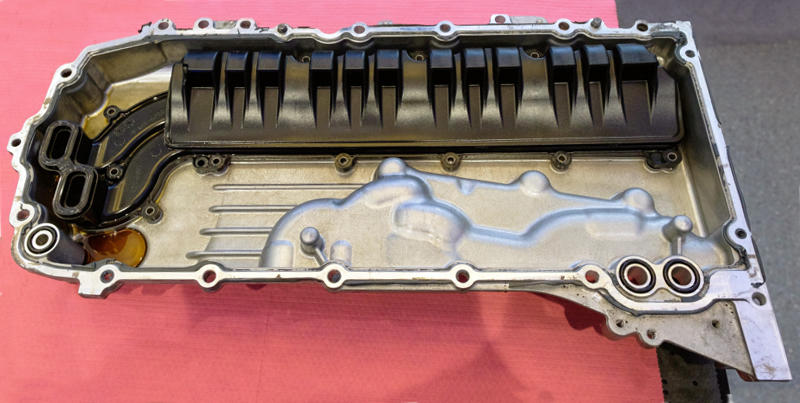
With the C7’s introduction in 2014, GM continued to expand the use of dry-sump oiling systems. Any ’14-’19 Stingray’s LT1 had a dry-sump if the car was equipped with the Z51 Performance Package. The LT4s in ’15-’19 ZO6’s and the ’19 ZR1’s LT5 were dry-sump engines. The C7 system was similar to that used on C6. The main difference was the oil pan which was altered to accommodate: 1) the Gen5 Small-Block’s oil-to-coolant heat exchanger and, 2) a revised pressure pump.
Standard on C8
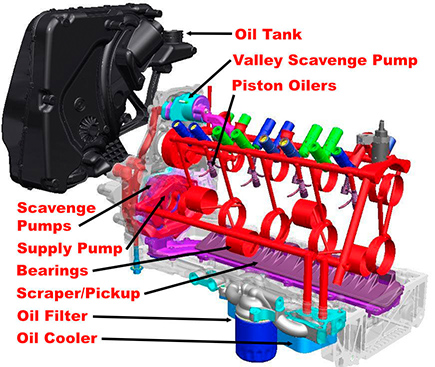
All C8s are “dry-sumped”. For the mid-engine car, the system was completely redesigned. There are now three scavenge pumps.
A third scavenge pump sucks oil out of the “valley” between cylinder banks that collects oil from the valve train. The oil tank is new and mounts to the front of the engine eliminating the hoses. Finally, additional scavenge pumps and no hoses allowed a reduction of oil capacity from 10.5-qts. to 7.5-qts. which makes the dry-sump tank smaller and lighter.
Oil Checking
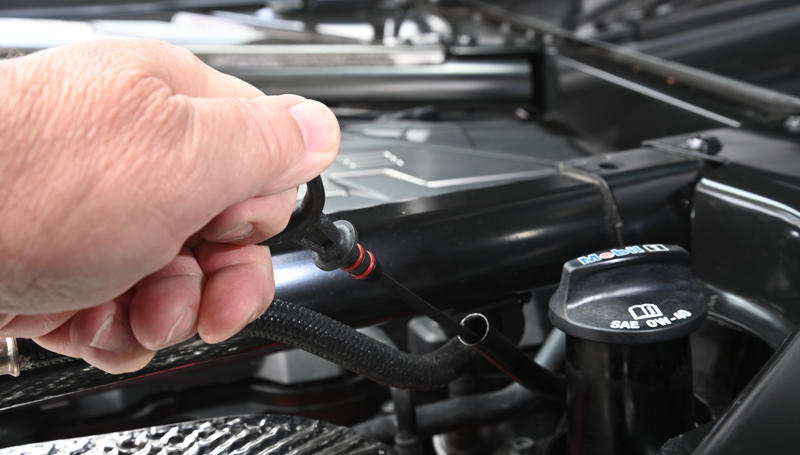
Dry sump engines require a special oil level checking procedure because when the engine is not running, oil in the supply tank drains back into the oil pan. When that happens, the indicated oil level will be inaccurate. How quickly drain back occurs depends on whether the engine is in a C6/C7 or a C8. Rather than somewhere on the engine block, the dipstick for a dry-sump engine is in the oil tank, adjacent to the oil fill cap.
Before oil level checking, oil temperature needs to be about 175°F. The best bet is to drive the car until the oil temperature reaches that range. The oil may reach that temperature with the engine just idling, but it takes longer.
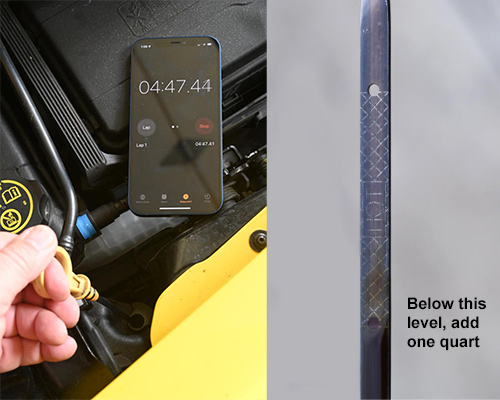
With 2020 and up Corvettes, the oil check procedure is even more unusual because it’s done with the engine running at idle. The oil temperature needs to be about 175°F. Park on level ground. Leave the engine running. Pull the dipstick, wipe it with a clean rag, re-insert the stick, then pull it a second time. The very bottom of the crosshatched section is the one-quart low mark. Add a quart of oil when the oil level is at or below that.
Oil and Filter Changes
Oil changes on Corvette dry-sump engines are also a bit different.


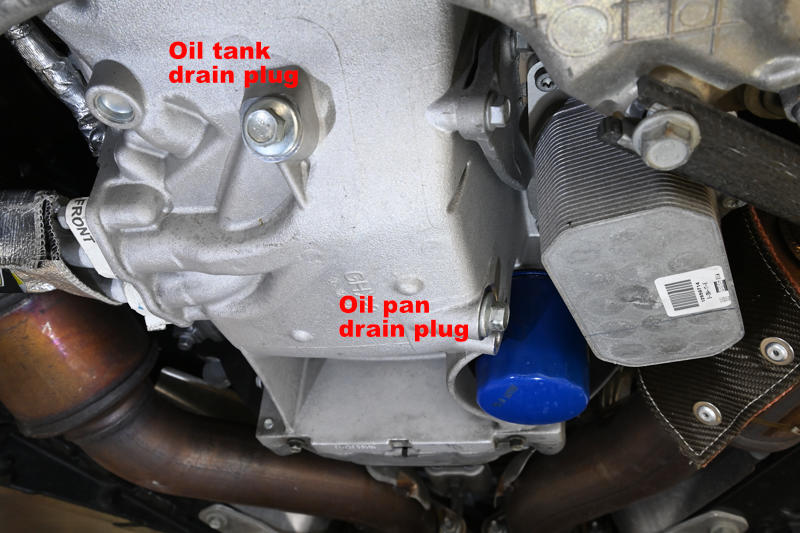
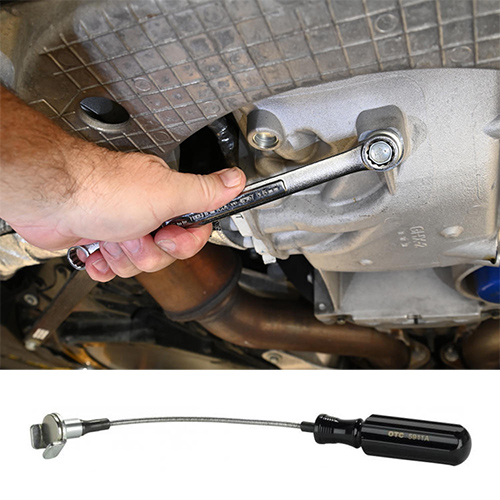
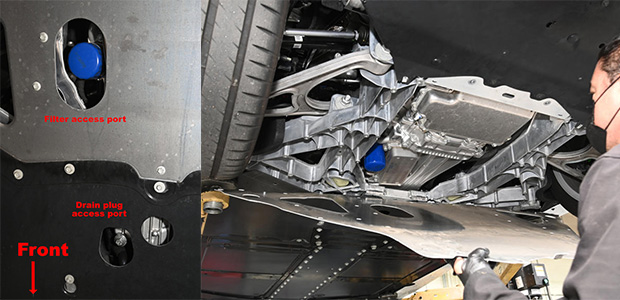
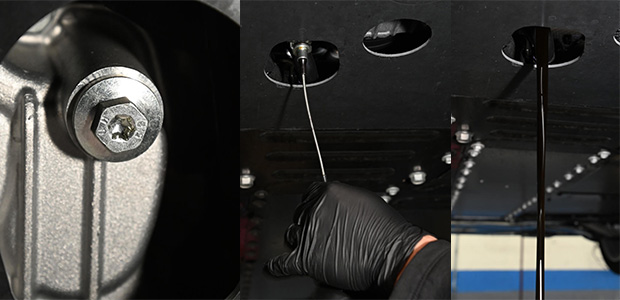
If you have a really large drain pan, you can remove both and drain all the oil at once, but in most cases do them individually and start with the front plug which drains the tank. We use a 15-mm box wrench to break the plug loose, then we use a handy tool from Matco, the “Drain Plug Pro” (PN MST5911A), to remove the loosened plug without getting oil all over your fingers.

Spectrographic oil analysis is a great way to stay on top of the condition of your engine. In most cases, we send a sample to Speediagnostix at every oil change.

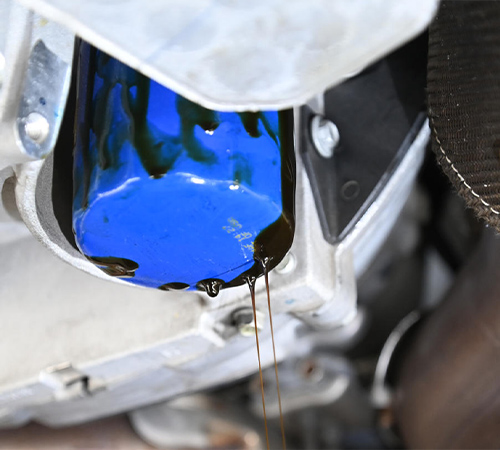
Move your drain pan under the oil filter. You’ll need an oil filter wrench designed for the smaller diameter filter used on C6 and C7 engines. A wide variety of these are available from automotive tool vendors. We like the “3-Jaw Oil Filter Wrench” from Matco tools (PN MST60C). It works well with the smaller diameter oil filters on contemporary GM engines. It fits a 3/8th-drive extension and it grips the filter tightly.

Use the Matco wrench to break the filter loose, unscrew it partway. Oil will begin to stream down the sides of the filter and into your drain pan.

The car in these images is a C7, all of which, along with the ’20-’22 C8 Stingrays, have Gen5 (LT1, LT2, LT4, LT5) Small-Blocks. Their computer-controlled, dual-pressure oil pumps are sensitive to the pressure differential at which the filter’s bypass valve opens so the proper oil filter choice is important. According to a GM Service Bulletin, issued in July 2018, Gen5 oil filters must have a 22-psi bypass.
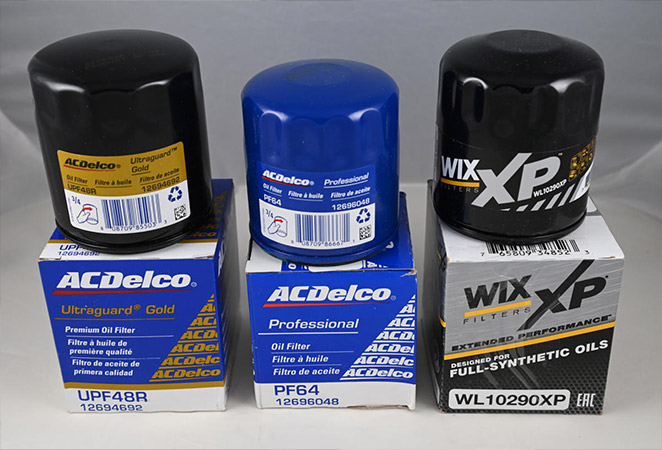
Good oil filters for Gen5’s are available from Zip Products. The first is the 2014-2023 PF64 Delco Oil Filter, the filter GM puts on Gen5’s at the factory. The other is the 2014-2023 WIX Racing XP Oil Filter, part of the Wix “XP” series intended for use with synthetic oil in street high-performance or racing duty cycles. Both those oil filters have the correct, 22-psi bypass valve.
ACDelco also lists its UPF64R “Gold Professional” oil filter for Gen5s in C7s, but its bypass valve opening is 60% higher, at 35-psi. Considering that July 2018, GM Service Bulletin, which cautions service technicians about filters not having 22-psi bypass valves, ACD’s listing of the UPF64R for Gen5 V8s in spite of its much higher bypass valve opening pressure has caused confusion in the Corvette community. As a result, the only two filters we recommend for use on a Gen5 Small-Block in a C7 or a C8 are the OE ACDelco PF64 or the high-performance Wix 10290XP.
If you are changing the oil on a C6 dry-sump, Zip has those filters, too. We suggest either the 2006-2013 PF48E Oil Filter, the stock filter for Gen4’s in ’06-’13 Corvettes or the 2006-2013 UPF-48R Gold Series Oil Filter, which is ACD’s premium oil filter for street hi-po and racing use. Gen4 Small-Blocks are not as sensitive to the bypass opening. While the two ACD filters have somewhat different bypass specs, 23- and 15-psi. respectively, both are good choices for that application.
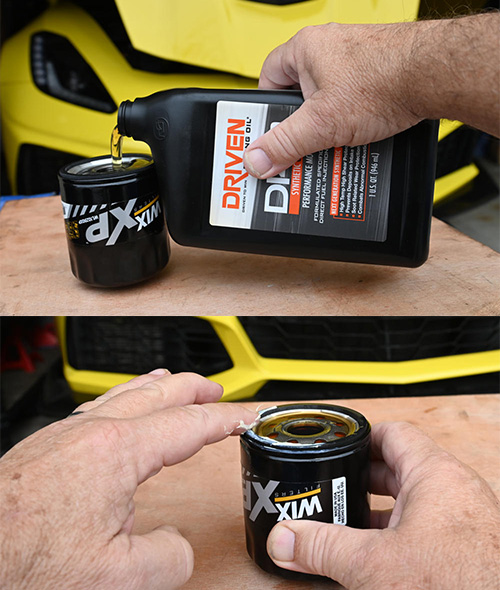
The ’06-’08 ZO6 dry-sump system’s capacity is 8-quarts including the filter change. The dry-sumps on ’09-’19 dry-sumps have a capacity of 9.8-quarts, including the filter. From either of those numbers, subtract the amount of oil used to pre-fill the filter, then add what’s left–should be approximately either 7.5 or 9.3-qt– to the engine through the oil filler in the top of the dry-sump tank. Some dry-sump engines have a removable cap on the passenger side rocker cover. Do not use that as an oil filler. You may damage your engine if you do so. In the C6 ZO6 era there was a rash of problems with folks, from DIYs to professional service techs, doing that by mistake. Don’t be one of those people.
Warm the oil to 175°F either with a road test or a long idle time. Shut the engine off. Wait five minutes, then check the oil. It should be at or near the top of the crosshatched portion of the dipstick. If that’s where the level is, you’re done.
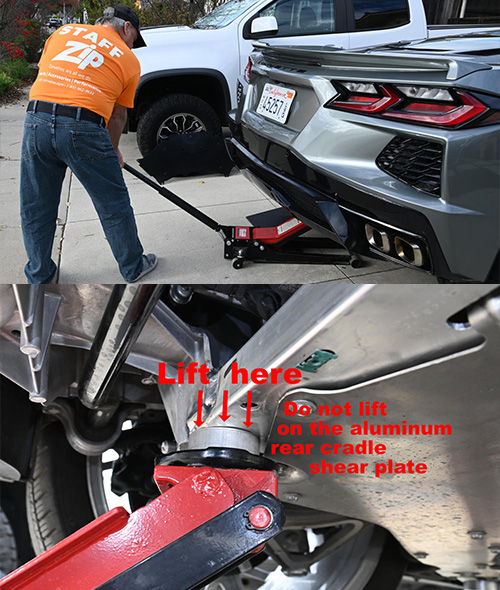
The 2020-2022 C8 Corvette has a different dry-sump system, so, expectedly, the oil drain procedure is different. Not only that, because the C8’s underbody structure varies so much from that of C6/C7, the jacking procedure is quite unlike that required by its front-engine predecessors. We’ll tell you right up front that oil and filter changes for the engines in C8s are far easier on a drive-on hoist or a twin post lift that comes in from the side.
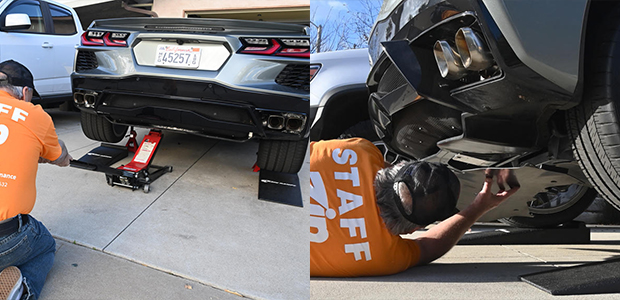
Nevertheless, a lot of we DIY’s don’t have hoists. Fortunately, it is possible to lift the back of a C8 with a floor jack and support it with jack stands, but the process a bit more work than it is with C6 or C7.

Start with the right side. Lift the right corner of the cross member enough to get a jack stand set on its lowest height under the jacking puck on the right side and release the jack to set the puck on the stand.
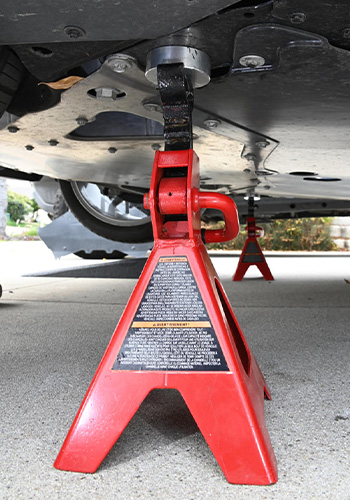
Move the floor jack to the left end of the rear cross member. Jack that side up such that you can get a jack stand, set two notches higher than the first one, under its jacking puck. Set the left side of the car down on that stand. Finally, go back to the right side, jack the right side up higher, raise the jack stand two notches. Release the floor jack and roll it out of the way.


Warm the oil to 175°F either with a road test or a long idle time. Park on a level surface and leave the engine running at idle, then check the oil. It should be at or near the top of the crosshatched portion of the dipstick. If that’s where the level is, you’re done.
C6-C8 Corvette Dry Sump Oiling System Service
Source: Zip Corvette Parts
8067 Fast Lane | Mechanicsville, VA 23111 | (800) 962-9632
Corvette Parts List Related to the Article:
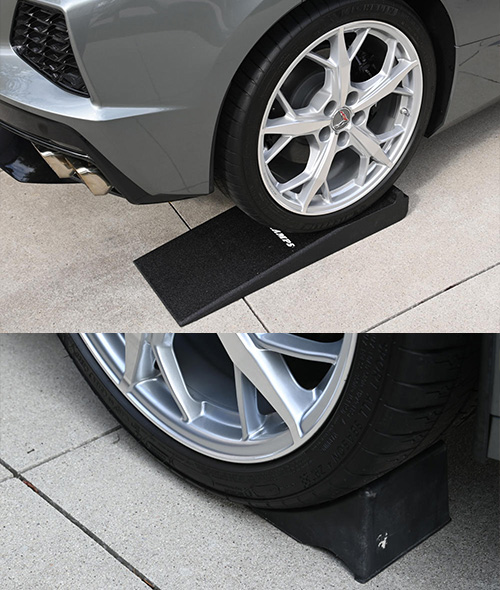
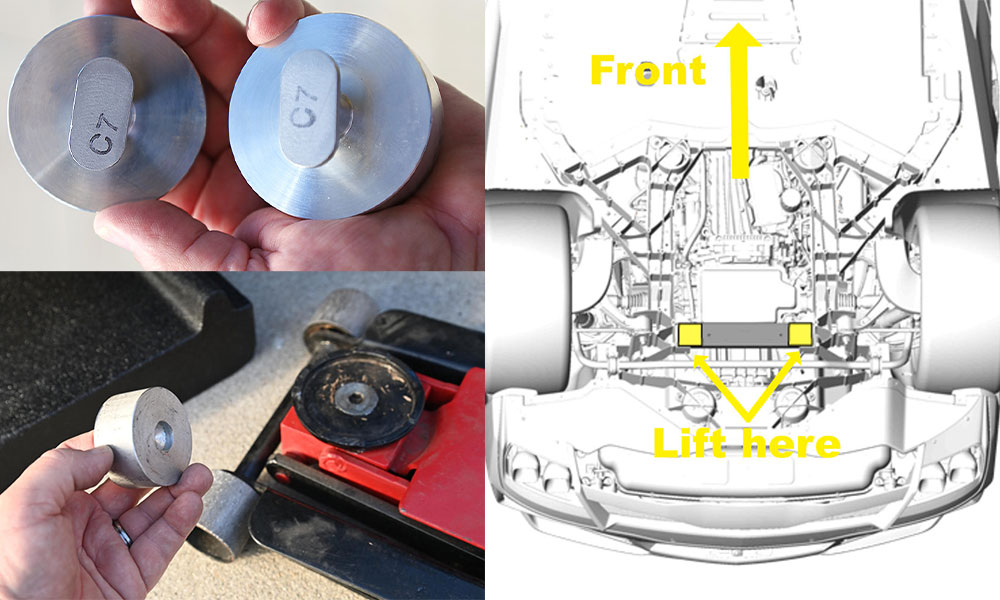
- Billet Aluminum Jack Pads
- 1992-2019 Magnetic Oil Pan Drain Plug
- 1997-2006 PF46 Oil Filter
- 2006-2013 PF48E Oil Filter
- 2006-2013 UPF-48R Gold Series Oil Filter
- 2014-2023 PF64 Delco Oil Filter
- 2014-2023 LT1, LT4, LT5 WIX Racing XP Oil Filter
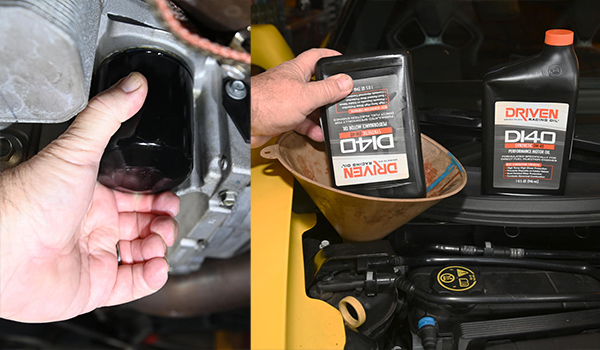
- Driven DI30 5w-30 Synthetic Direct Injection Performance Motor Oil
- Driven DI40 0w-40 Synthetic Direct Injection Performance Motor Oil
The C8 2021 manual, page 239, states “… If the oil is below the cross-hatched area at the tip of the dipstick, add 1 L (1 qt) of the
recommended oil …”
You state :The very bottom of the crosshatched section is the one-quart low mark. Add a quart of oil when the oil level is at or below that.”
Going with the manual statement it seems logical that if the level is below the crosshatched area, then adding 1 qt of oil is a good idea. Given the C8 can take more oil than 7.5 qts, adding the full quart seems logical.
Can you clarify how your statement (specifically “bottom of crosshatch”) relates to the manual “specifically “below the bottom crosshatch)?
Additionally, if you have time to expand the article, I would like to know where the oil reads when it is “full” at 7.5 quarts and where it reads after additional oil is added when the car it tracked.
I bought a used 2014 Z51 and of all the Vettes i have owned 64 and up this is the best! Halverson always includes lots of detail in his writing and this article is not exception. Very informative and helpful to know how to care for the old boy even as it approaches 9 years on earth it only has 12,000 miles. Since I retired actually fewer trips darn it. Thanks for publishing such a informative article.