There comes a time in the life of a Corvette, especially the older C3s, when the weather seals need replacing. Our project Stingray is going on 35+ years-old now and the seals, including the T-tops, doors and windows, are starting to show their age. We don’t dare go through a jet spray car wash without a raincoat. And in a hard rain, water has splashed back from the back window seal, not to mention the road and wind noises when cruising the highways and interstates.
So it was time to take action and do something about these annoying problems. With a quick call to Zip Corvette Parts, they set us up with a C3 Corvette body weatherstripping kit that replaces the seals on the t-tops, front and back window pillars, doors and engine compartment. Replacing the seals in a C3 Corvette is not a difficult job. The best advice is to let the chemicals do their job. The 3M Release Agent works great if you allow it a few minutes to soak into the old adhesive. And the 3M Adhesive Cleaner effectively finishes the clean-up task. It is a simple matter of rolling back the seals, spraying on the Release Agent where the seals meet the surface it’s bonded to, letting it sit for a few minutes, then removing the old seal. If it rips or pieces stay on, that’s okay because the Cleaning Agent will remove them.
After clean-up, apply adhesive to both pieces being bonded and let them sit for 10-15 minutes to get tacky, then bring them together. It’s good to have an assistant to hold the seal away from the surface while you snug the seal into place. Follow along as we do one side of the T-top so you can see how easy the whole process is. Replacing the window side pillar and door seals is similar. It’s definitely worth a few hours in an afternoon. 1970-1977 Corvette T-Top Weatherstrip Installation:

01: Zip Corvette Parts supplied us with the much-needed chemicals, like 3M Release Agent (this stuff works!), 3MSuper Weatherstrip Adhesive and 3M General Purpose Adhesive Cleaner.

02: When working with the T-tops, be sure to protect the painted surface by laying the tops on a soft towel or cloth. It is easy to forget there is a painted surface on the other side and it’s very easy to scratch the surface.

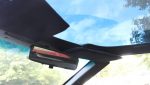
03: Here is a close-up of the condition of our T-top seals. This is the underside that should seal with the top of the window.

04: Here’s a close-up of the seal after it was removed.

05: Start the removal of the old seals by rolling it back and spraying the Release Agent where the seal is glued.

06: The T-top seals have these white hard plastic tips in the seals that help hold the seal in place. They come preinstalled in the new seal so we will need to go back and remove these.

07: A screwdriver can help with the removal of the old seal, especially around the securing tips.

08: Here we have removed the old weatherstrip and are about to remove the remaining seal securing tips with a pair of pliers. (New retainers and grommets are provided.) Now you can remove the old movement.

09: Now clean the remains of old adhesive and seal remnants off the T-top. This is where the 3M Adhesive Cleaner will help dissolve the material. Take a shop rag and soak it in the cleaner, then start rubbing. If possible, apply the cleaner directly to the old adhesive and let it sit for a few minutes. Just be careful not to get it on anything else. If you do, wipe it off immediately.

10: Before applying adhesive, we took the time to spruce up the underside of our T-tops by touching up the black paint and shining the chrome pieces. Then we were ready to apply adhesive to the underside of the T-top. Do a dry fit to make sure you have the right weatherstrip and all appears okay. Then apply adhesive, making small connected Z’s in the wide areas and lines in the narrower areas.

11: Be sure to apply adhesive to both surfaces that are to be bonded. Then wait until it reaches a tacky-to-the-touch dryness and they are ready to be installed. Here is where an assistant can be helpful by holding the seal up and only letting it touch where you are bringing it together. Use a screwdriver to help tuck the seal in around narrow areas and those white tabs.

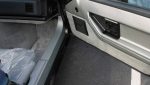
12: Here is our T-top done and ready to be put back on the car. Just repeat the process for the other T-top, window side pillars, and doors and you’ll be ready to tackle the elements once again.
C3 T-Top Weather Seal Replacement: 1970-1977 T-Top Weatherstrip Installation
Source: Zip Corvette Parts
8067 Fast Lane | Mechanicsville, VA 23111 | (800) 962-9632
Corvette Parts List Related to Article:
- 1970-1977E T-Top Panel Weatherstrip
- 1970-1977E T-Top Weatherstrip (Latex)
- 1977L-1982 T-Top Panel Weatherstrip
- 1977L-1982 T-Top Panel Weatherstrips (Latex)
- 1973-1977E Body Weatherstrip Kit
- 1973-1977E Body Weatherstrip Kit (Latex)
- 1977L Body Weatherstrip Kit
- 1977L Body Weatherstrip Kit (Latex)
- 1978-1982 Body Weatherstrip Kit
- 1978-1982 Body Weatherstrip Kit (Latex)
- Shop/Repair Manuals