
Your 30 year old, all numbers and date code matching Corvette’s water pump starts to leak. What are you going to do? You have worked very hard making sure every original part is still on the car so buying a new replacement water pump is not an acceptable solution. You could send the water pump out to be rebuilt, but are you sure you will get your pump back? What happens if it is lost in shipment? All of the questions are making you ill. The answer is very simple….. rebuild the pump yourself. I know what you are thinking. No Way! I need specialized tools and special parts. Actually, all you need is access to a hydraulic press and a call to Zip Corvette Parts. A simple call will get you every piece you will need to do a thorough and correct rebuilding job on your existing pump. We accomplished this entire rebuild in one afternoon without any complications. Now with all of this in mind, let’s get that pump rebuilt and keep your numbers matching.

01: Here are all of the pieces that are included in the 1956 to 1982 Water Pump Rebuild Kit from Zip. The only other items you will need is access to a hydraulic press, sand or beadblaster, hand tools, engine paint, masking tape and shop manual for your year Corvette.

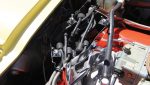
02: Remove the water pump as per your shop manual’s instructions. The fan, fan pulley and heater hose fitting should be removed from the pump. Next use either a wrench or flat blade screwdriver (depending on your year water pump) to remove the six bolts or screws that secure the rear plate.

03: Support the fan hub in the press. Now using a 1/2” press bar or 1/2” grade 8 bolt press the water pump shaft out of the hub. Remember to hold onto the water pump while you press it out. They do not bounce well when they hit the floor.

04: Support the water pump housing at the top and bottom of the housing itself. Make sure that you leave enough room for the shaft and impeller to fall out of the bottom of the housing. Use a 7/8 deep well socket to press the bearing and race assembly. You do not want to press on the shaft. You want to press on the bearing and race. Slowly press the shaft and impeller out of the housing.

05: You can now take a scraper and remove all of the old gasket material. Remember to also clean the mounting surfaces on the engine block. Now would also be a good time to touch up the front of the block, if it is needed.

06: The water pump housing can now be cleaned. Use a paint stripper and remove all of the old paint. Next place the housing in a beadblast cabinet (you can also use a sandblaster) and clean the entire outer surface. After this is done, thoroughly clean all of the blasting sand or beads out of the inside of the housing. Make sure you inspect the entire housing for any cracks before you begin assembly.

07: Again support the pump housing at the top and bottom and press the new bearing/shaft assembly into the housing. The longer grooved end of the shaft goes into the housing.

08: Take a 7/8” deep well socket and set it against the bearing race. Carefully press the shaft/bearing assembly into the housing. The bearing/race assembly should be flush with the housing when properly installed.

09: Now install the new seal (as shown) over the shaft at the back of the pump.

10: Use a socket that will apply pressure to the seal’s outer flange only. Take a hammer and socket and tap the new seal into place. This seal should bottom out against the flange on the water pump housing. Turn the water pump over and check that the shaft/bearing assembly is still in the correct flush position.

11: Position the fan hub flat against the press plates. Next position the shaft so that you can press it into the fan hub. Now slowly begin to press the shaft into the fan hub. The correct measurement is 5 5/8” ± 1/16”. This measurement is taken from the mounting surface of the fan hub to the block mounting surface of the pump. This picture will show you the easiest way to obtain this measurement. When you are done, the shaft will protrude through the hub approximately 1/4” to 3/8”.

12: Place the small metal/rubber seal over the end of the shaft. The rubber part of the seal will face toward the pump’s impellers.

13: Take the new impeller and lay it on a totally flat surface (a piece of glass works well). Make sure that all of the blades touch the glass and are even. This is very important when the impeller is installed (our Kit had 2 blades that needed adjusted). If the blades do not touch, bend them until they do. Carefully position the new impeller over the shaft. Use a 5/8” deep well socket to apply pressure to the center of the impeller. Now begin to slowly press the impeller into place. You do not want the blades to come in contact with the housing. There should be anywhere from .010 to .0135 clearance. When the clearance is achieved, spin the shaft and make sure none of the blades come in contact with the housing.

14: Apply gasket sealer to both sides of the water pump housing gasket and position it into place on the housing. Now select the correct rear housing plate. Pre 60s used the flat plate. 60s up used the stepped plate. Remember the gasket and plate can be positioned in two correct ways. The rounded sides are opposite each other and go on the top and bottom.

15: There were also two different types of attaching screws. Pre-60 used the slotted head screw. 60s and up used the cap screw. Choose the correct one for your application.

16: You will want to paint the pump after the assembly. Use masking tape and paper towels to close off all of the openings. Next wash the exterior with lacquer thinner two or three times. Now using Chevrolet Orange, start by spraying 2 to 5 light to medium coats. Allow each coat to tack before you spray the next coat.

17: Here is our pump, rebuilt, repainted and numbers matching.
Water Pump: 1956-1982 Corvette Water Pump Rebuild
Source: Zip Corvette Parts
8067 Fast Lane | Mechanicsville, VA 23111 | (800) 962-9632
Corvette Parts List Related to Article:


With a lot of your repair manuals I am very pleased. Did already a lot of work on my 1969 C3. The reason for that is the possiblility to blow-up the pictures that makes ones life very simply. However not all of your manuals allow to download the pictures. One of them is the manual for replacing the tachometer and reapairing the speedometer (the ones I am working at now) Materials needed are bought from your warehouse and also the Assembly Manual you supplied in the past is a big help.But again, blowing-up pictures would be a great help for me.
Maybe this is something you could think of doing in future (usually it would require only a software change)
Please this is not a complained but just a nice comment as I am very pleased with all the help (called spare parts) that I received from you over time.
Kindest Regards, Ab
Thanks! Yes their seems to be a problem with the app that converts them to PDFs. Have you tried to save the article as a PDF with your web browser? Thanks