The ignition coil is the very heart of the fire for older Corvettes, and it’s one of those parts that can fail totally without warning, or give you subtle hints of its imminent demise. The latter was the case with the coil on my ’67 big-block coupe with transistorized ignition. The first symptoms were a noticeable loss of pep in the lower RPM range, “breaking up” in the higher rev range, and some serious post-ignition, more widely known as “dieseling” when the ignition is shut off. A new coil was ordered from Zip Corvette Parts, and here’s what it took to install it.

01: The first task is to remove the wing nuts that secure the top of the ignition shielding, and then to remove the top itself.

02: The upper side-shielding bolt is removed next, with either a nut driver or socket doing the trick.

03: The lower side-shielding bolt is best accessed using an open-end, box, or gear wrench, as shown here. Remove the side-shielding bolt (or bolts, depending on your model year) from the other side of the shielding as well.

04: You’ll have to remove the spark plug and coil wires to remove the side-shielding, so it’s a good idea to make a diagram of the plug wire orientation before you pull them, numbering the wires with small pieces of masking tape. That way you’ll avoid confusion when it’s time to button things up.

05: You’ll also have to disconnect the leads from the coil and, once again, a simple diagram keeps things from getting confused. Once these leads are disconnected, remove the spark plug shielding nuts to release the plug shields and the side shielding assembly can then be lifted off.

06: With the shielding out of the way, a screwdriver is used to loosen the screw on the coil retaining bracket. Once loosened, the coil can be pulled out of the bracket.

07: It’s extremely important to get the correct coil for your model year. Less expensive “standard” replacement coils available from the local auto parts store will not work; the correct coil has an internal ballast resistor, and the “standard” coils do not. The result of using a bargain coil is that the engine won’t start! It’s also important to order the correct coil for your ignition system — in this case, it’s a transistor ignition.

08: After securing the new coil in place, you can proceed to re-install the ignition shielding and replace the bolts removed previously.

09: The spark plug shielding can then be secured using the 3/8-inch nuts removed earlier from both sides of the distributor — four shields per side.

10: Secure the condenser/negative coil leads and the positive coil lead and then install the plug wires into their respective places on the distributor. Reattach the coil wire that mates the distributor to the coil last.

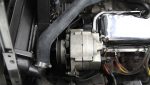
09: Here’s what the ignition system looks like prior to reinstalling the lid on the shielding. That’s all there is to it. Total install time: about one hour, start to finish.
1957-1974 Corvette Ignition Coil Replacement: Corvette Ignition Coil Replacement
Source: Zip Corvette Parts
8067 Fast Lane | Mechanicsville, VA 23111 | (800) 962-9632
Corvette Parts List Related to Article: