
by John Pfanstiehl
Brake Bleeding is required after changing calipers, changing brake lines and hoses, changing a master cylinder or rebuilding calipers. But it is also part of regular preventive maintenance. DOT 3, DOT 4 and DOT 5.1 brake fluids absorb water over time which then cause brake components to rust and deteriorate from the inside. Many factory maintenance schedules call for flushing the old brake fluid and replacing with new every two to three years.
Fluid Choice: Choosing which fluid to use when flushing a brake system or when topping off a master cylinder when bleeding the brakes is simple for most owners. DOT 3, DOT 4 and DOT 5.1 brake fluids all play well with each other. Any can be added to a system that had another. The primary difference is that their boiling temperature is higher with higher numbers. DOT 4 or DOT 5.1 is a better choice when the brakes get really hot like on a road race course. For street applications, fresh DOT 3 Brake Fluid is fine and Zip offers it in a quart size which is plenty for flushing any Corvette brake system.
DOT 5 Pros: DOT 5 has an entirely different chemistry and is often referred to as silicone brake fluid. Unlike the other brake fluids, it doesn’t absorb water and therefore can be used in a system almost indefinitely. I recently inspected a Corvette brake system that used DOT 5 in a very humid climate for over twenty years – everything looked perfect. Also DOT 5 doesn’t damage paint. The other brake fluids can damage some paints, especially fragile finishes like lacquer, if spilled on them.
DOT 5 Cons: Some aftermarket manufacturers of brake components are using rubbers that swell and get soft in DOT 5. Warranties on these products are voided if used with DOT 5. Also DOT 5 is not compatible with the other brake fluids. Therefore, when changing to or changing from DOT 5, the brake system should be thoroughly flushed. Anti-lock brake system (ABS) vehicles may also specify to not use DOT 5. It’s also worth mentioning that some people feel DOT 5 results in a softer brake pedal.
Brake Bleeding Methods: The tried and true two-person method is discussed below and the use of a Motive pressure bleeder from Zip Corvette is shown. Gravity can also do the job and actually works well on many Corvettes. A fourth method is applying a vacuum to the bleeder but it’s not as easy to see when all the air is out of the system because air can leak by the bleeder threads causing bubbles in the outgoing fluid.
Let’s get going and see how to bleed the brakes. A C3 is shown but the procedure is similar on many Corvettes and other vehicles.
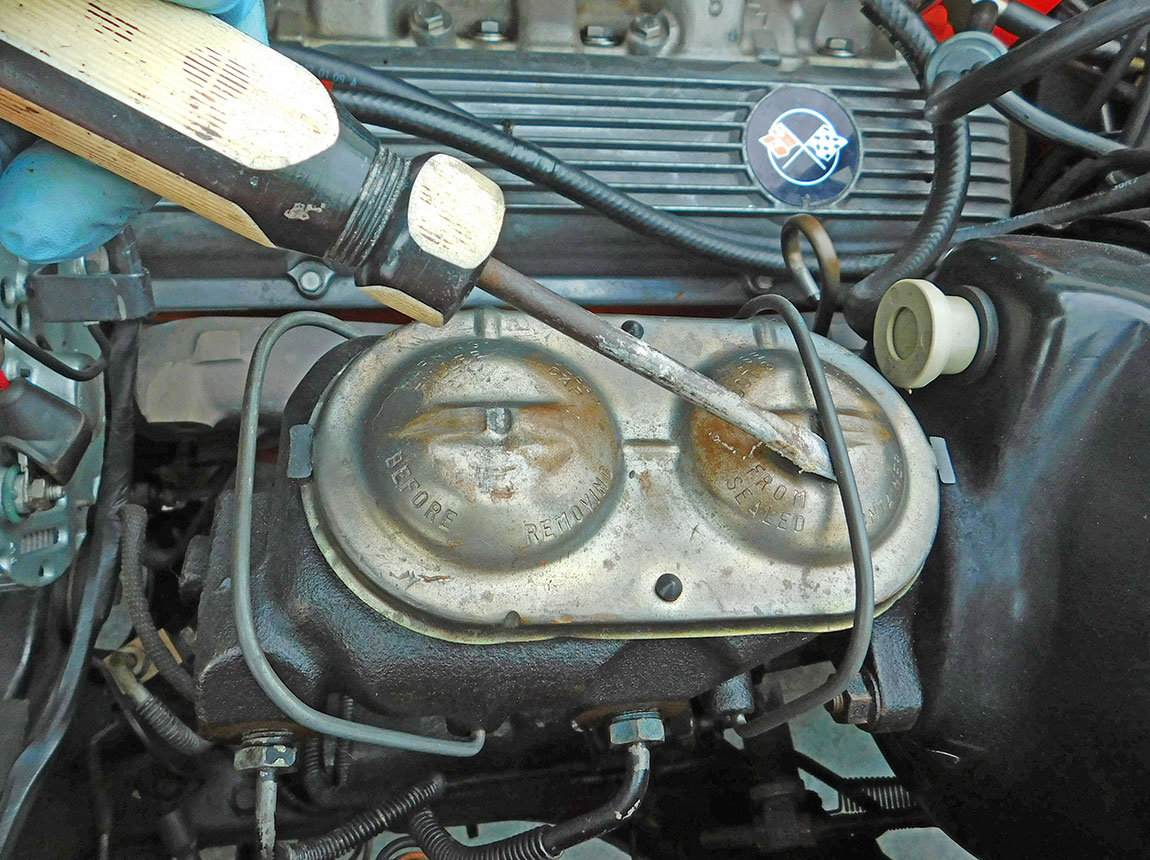
01: Remove the cover on the master cylinder. While the cover is off, turn it over and inspect the rubber seal. Both the Master Cylinder Seal and Cover are available from Zip.

02: Inspect the brake fluid. If it is dark or cloudy, it’s time to flush the old brake fluid and replace it with new brake fluid. DOT 3, DOT 4 and DOT 5.1 brake fluids absorb water which then causes brake components to rust from the inside.

03: Empty the master cylinder before flushing out old fluid. A turkey baster makes fast work of removing the old fluid.

04: Refill the master cylinder with new fluid prior to bleeding. To prevent fluid from splashing, place the cover back on the master cylinder if bleeding manually. Recheck the fluid level during bleeding. If it empties, air will be introduced into the system.

05: The two-person procedure is tried and true. Make sure your Corvette is on a level surface and start bleeding the caliper farthest from the master cylinder (right rear). Tell the helper “DOWN” to push on the brake pedal, then open the bleeder and let the air and fluid drain. Close the bleeder and then, and only then, say “UP” to allow the pedal to come up. Repeat until no air bubbles are seen and the fluid is clear.

06: If a helper is not available, an inexpensive pressure bleeder from Motive Brake Bleeding is available from Zip.
Tip: To make the dual master cylinder lid fit even better, drill ½ inch holes at the far ends of the aluminum plate. Then pop off the cover retaining clips and install the plate. Or simply use a large C-clamp on the plate before pumping the pressure up to five to ten psi.

07: The front calipers have only one bleeder and it can be accessed without removing the wheel. Turn the wheel and use a 5/16 inch or 8 mm wrench on the bleeder.
Tip: a box wrench works best. And a six-sided wrench or socket is desirable for breaking loose tight bleeders.

08: Remove the rear wheels because the rear calipers have two bleeders and the outboard bleeder can’t be accessed with the wheel on the car. The ground clearance and large perimeter frame make jacking up C2s and C3s much easier than later models.

09: Insert a clear ¼ inch hose over the bleeder and run it into a catch bottle. The clear hose shows when the new clear brake fluid has flushed out the old dark fluid, and it shows when there are no more air bubbles coming from the caliper.
Tip: tap the caliper with a hammer to help dislodge any remaining air bubbles.

10: Retighten all the bleeders and any brake lines that were loosened or replaced. Wipe the flare nuts, bleeders and hose connections until they are free of any brake fluid.
Tip: rub them with a paper towel to make sure they are completely dry. Do the same after pressure testing.

11: Pressure test the brake system. If the car has power brakes, start the motor. Press very firmly down on the brake pedal for fifteen seconds or longer. Repeat this several times. Recheck the bleeders and hose connections for any seepage. Further tighten any that appear wet.

12: Top off the fluid level and replace the master cylinder cover. A new cover from Zip is a quick way to brighten up the engine compartment.

13: Install the wheels and the brake bleeding is complete. It’s good practice to tighten every other lug nut even though there’s little chance of warping Corvette’s beefy rotors. Torque to about 70 ft lbs.
Tip: placing tape on a basic beam-type torque wrench makes it easy to see when the target torque is reached.
Optional Things to Do When Bleeding the Brakes

a. This is a good time to clean the insides of the wheels. Compare how good this clean rear wheel looks compared to the front wheel in the prior photo which was coated with a layer of brown brake dust.

b. While the wheels are off, it’s easier to replace a deteriorated frame bumper on the rear or replace the bumper on the A-frame in the front. Both are available from Zip.
Corvette Brake Bleeding
Source: Zip Corvette Parts
8067 Fast Lane | Mechanicsville, VA 23111 | (800) 962-9632
Corvette Parts List Related to Article:
Does the brake bleed sequence really matter? I noticed the article did not specify which wheel to start with and which to end with. I’ve seen conflicting recommendations. Some say start with the wheel nearest the Master Cylinder and end with the furthest away. Others recommend the opposite. I have a C2.
Hi Daniel,
Our head tech at Zip recommends starting with the wheel furthest from the master cylinder and ending with the closest wheel.
Thanks
I would recommend one other method, which some times is referred to a s gravity bleeding.
1. Remove old fluid as you recommend
2. install clear tubes on each bleeder
3. open all bleeders and allow fluid to drain in to collection device ( old coffee can would work)
4. let the fluid drain ( by gravity) on its own , this may take some time and as this is happening, replace it with new fluid in the master cylinder.
5. watch for bubbles in the clear tubes and a change of color to the new fluid
6. When sufficient new fluid is seen , you may close the bleeders , This usually takes about one Qt to do the entire system.
7. What i do not recommend is the ” pump and hold to the floor method”
This caused the master cylinder piston to travel PAST the normal wear area ( your brake pedal normally does not travel to the floor ) when you go past the normal travel area it is possible you may damage the seal on the piston and cause damage to it. and possibly have to rebuild or replace the master cylinder shortly after the brakes are blead .
i learned this from a GM technician ( and experience) most of the C3 are around 50 years old and the master cylinder may also be that old
I thought there was a certain wheel sequence to follow when bleeding brakes…..I own a C1. Thanks….
Hi Ron,
We recommend starting with the wheel furthest from the master cylinder and ending with the closest wheel.
Thanks
I HAVE A 67 CORVETTE WITH BLEEDERS ON MASTER CYLINDER..WHEN DO THEY GET BLED??? I am useing a motive pressure bleeder
Gerry,
It’s not just a ’67 original dual master cylinder that has bleeder screws on it, early C3s do as well. Most replacement master cylinders from aftermarket manufacturers do not have these. These bleeders do not need to be touched UNLESS the master cylinder ran dry, you had the master off the car to rebuild it, or you are replacing the master cylinder with a new one. IF you have one of these cases, start with these bleeders FIRST. They were put there to allow you to “bench bleed” the master
cylinder ON THE CAR as opposed to on the workbench in a vise. Bench bleeding or bleeding these first will keep the air trapped in a new or newly rebuilt master cylinder from being pushed into the brake lines, distribution blocks, and down to the wheel cylinders/calipers.
I bought a 1966 vett it had a restoration done to include brakes ,calipers ,etc. How can I tell if dot 5 was used ?
I’m surprised no one has mentioned the correct sequence of which bleeder valve to bleed from first, before the other one. Which wheel is always the farthest, then work the last wheel to be done is the one closest to the master cylinder. I hope this is informative, constructive criticism is appreciated.
oops, its the inside bleeder on the r/r wheel 🙂