
by John Pfanstiehl
Corvette’s introduction of disc brakes in 1965 was a tour de force. Each wheel had a big 4-piston caliper clamping on a heavy duty vented rotor. That’s 16 caliper pistons total which greatly elevated Corvette’s performance and racing capability. By comparison, most ‘disc brake equipped’ US cars that followed had only single piston calipers on the front wheels.
Sometimes, performance has a price. After many miles and years on the road, some of those 16 caliper piston seals leaked. In the seventies and eighties it was not unusual to see photos of Corvettes for sale with a puddle of brake fluid inboard of the tires.
The cast iron caliper bores became deeply pitted to the extent that it took a lot of time to remove the pits with a brake hone. Installing stainless steel sleeves into the bores completely solved that common problem and today it is rare to find a C2 or C3 caliper that doesn’t have them. Those stainless steel sleeves now make rebuilding calipers faster and easier than in the old days.
There is one important caution in selecting caliper rebuilding kits or rebuilt calipers. Some rebuilders will state that their warranty is void if DOT 5 brake fluid is used. This is because the rubber some manufacturers use for making the O-Ring seals swells with DOT 5. Our tests found that the orange High Temp O-Rings definitely swell from contact with heated DOT 5 brake fluid. However, the black standard lips seals available from Zip Corvette (and older original lip seals) appear to have no problem with currently available DOT 5 fluid.
If the manufacturer warns not to use DOT 5 fluid with their caliper or rebuild kits, heed that warning and use DOT 3 Brake Fluid (available from Zip), Dot 4 (for high temp applications) or DOT 5.1 (which is entirely different than DOT 5). For more information on brake fluid choices take a look at this how to article on Corvette Brake Bleeding.
For this article, we’ll show how to rebuild or replace C2 and C3 calipers but the process is similar, and usually easier, on later models. We’ll spotlight the rear calipers but rebuilding the front caliper is even easier because the front brake hoses seldom give a problem or require replacement. When rebuilding front calipers, just break the hose lose at the caliper and unscrew the caliper from it. Use the same brass washer and screw the caliper back on after rebuilding. The hose will still be aligned properly. There’s no need to disconnect the flare nut at the other end of the front brake hose. The following steps and tips also cover replacing calipers – just skip the rebuilding steps.

01: One caliper rebuilding option for racing applications is the High Heat Rebuilding Kit available from Zip. These parts can handle DOT 3, 4 or 5.1. but won’t last using DOT 5 brake fluid. Notice that one of the O-Rings has swelled to a larger diameter in just three days in DOT 5 in our test.
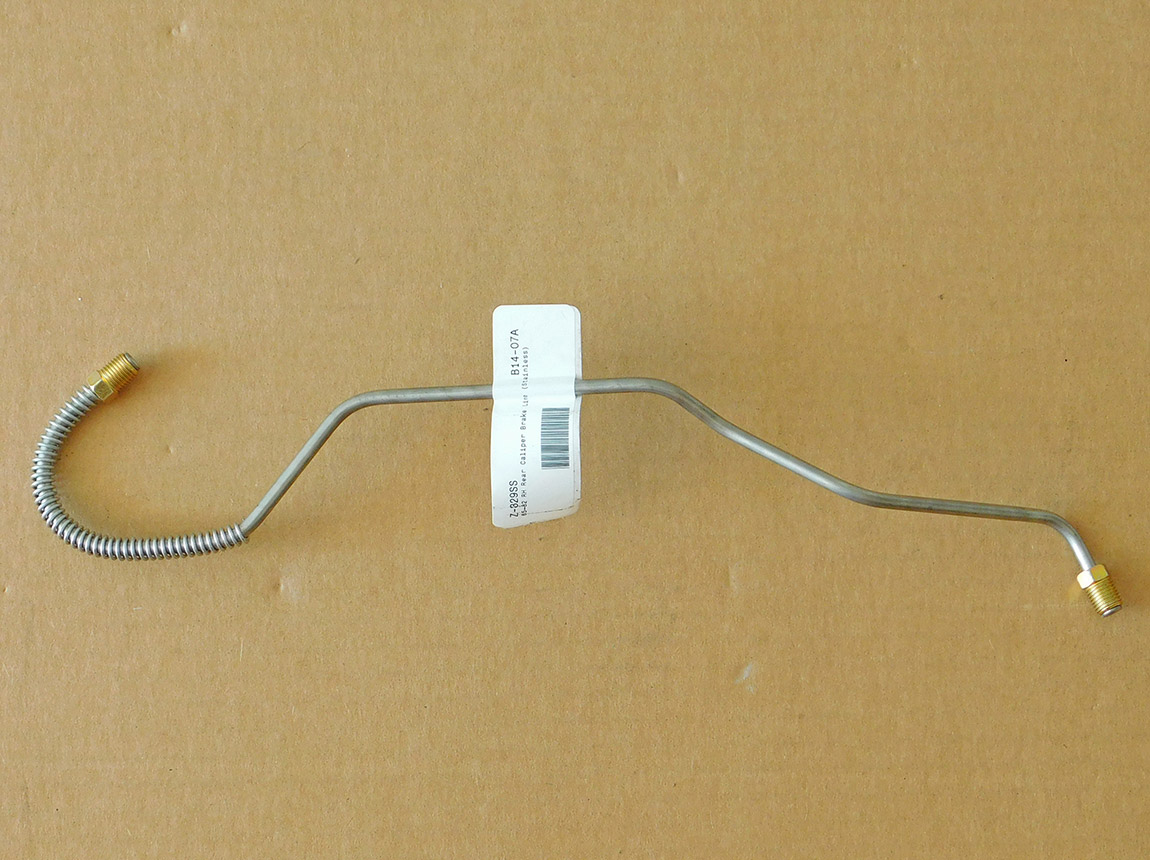
02: Preformed Caliper Brake Lines are available from Zip, both in stainless steel and steel. If these lines have not been removed in years, consider ordering them to have on hand. Often, the inside of the flare nut rust-seizes to the steel line and the line is twisted and is ruined during disassembly. Replacement brake tubing from a local parts store won’t work well here.

03: Jacking a C2 or C3 is easy compared to later years. Unlike a C5 for example, there’s plenty of room to slide a floor jack under the car. The beefy perimeter frame couldn’t make it any easier for access by a jack or jack stand.
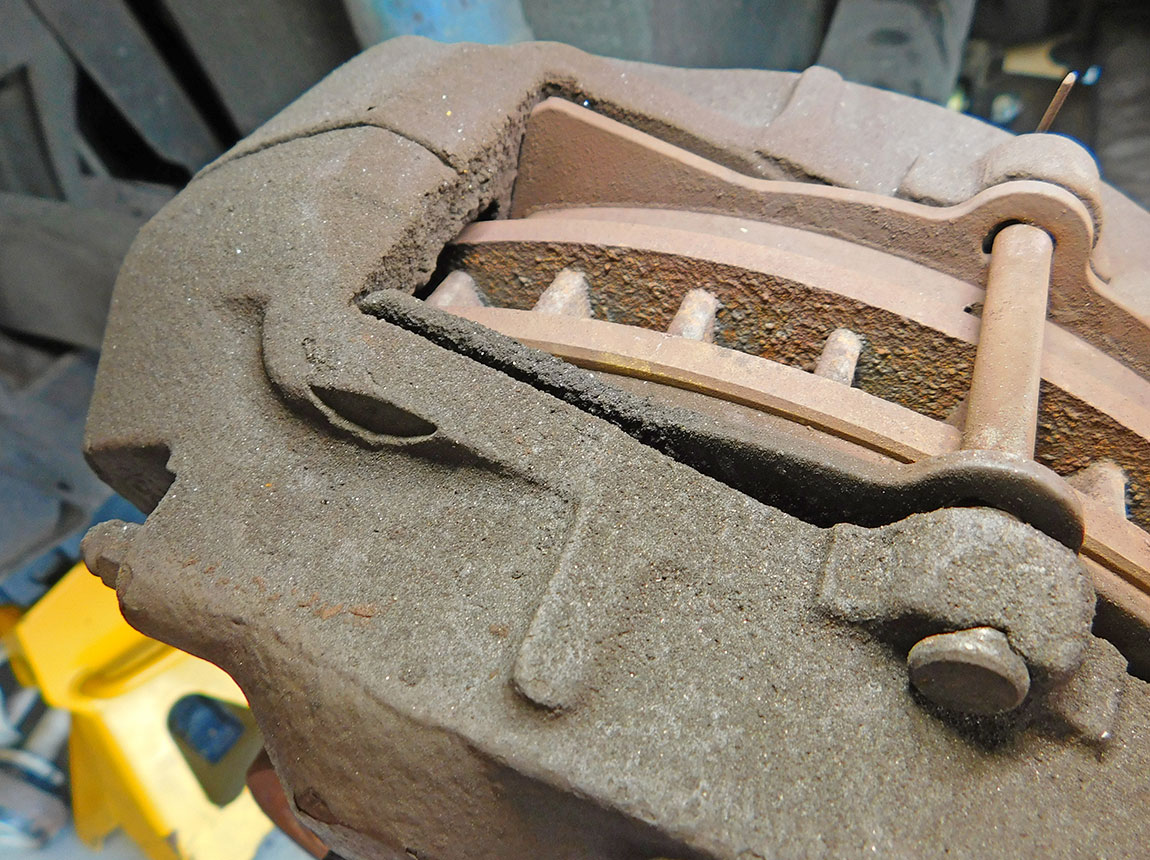
04: The dirt accumulated by one of the pistons is a sign that it has started to weep brake fluid. It will only get worse, so we’re taking action early by rebuilding the calipers.
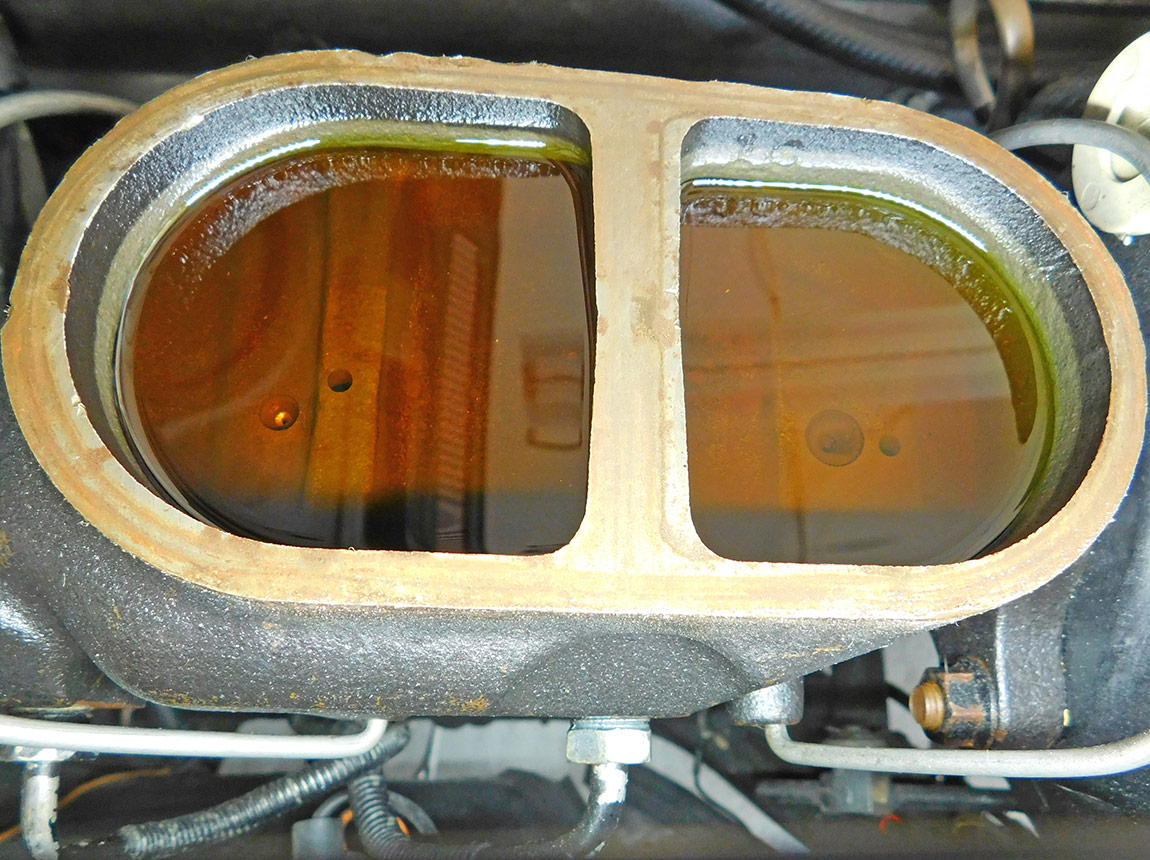
05: Inspect the fluid in the master cylinder. DOT 3 and DOT 4 are light amber color when fresh. If the fluid is dark or cloudy, this is a good time to flush the system with new fluid. Zip offers DOT 3 Brake Fluid in the quart size which is plenty for the entire system.

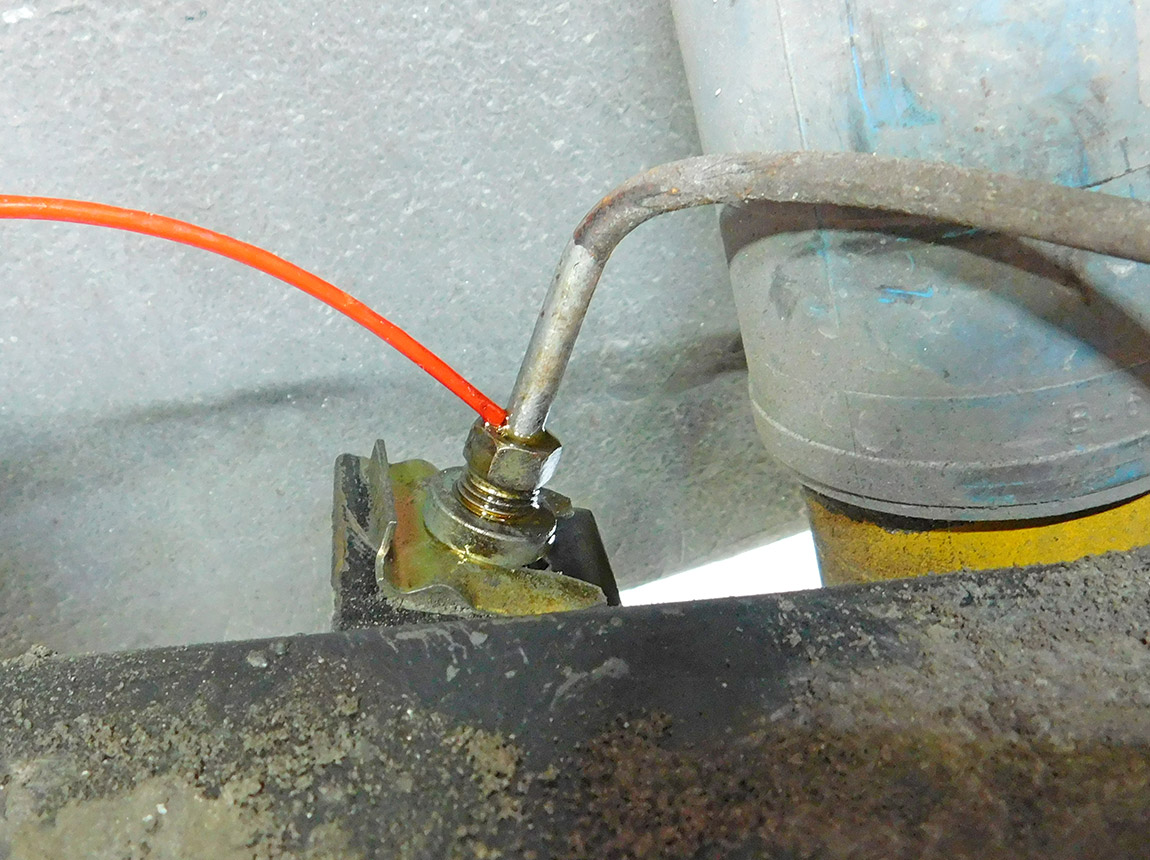
06: Gently pinch the rubber brake hose with locking pliers if the system is not to be flushed. If the system is going to be flushed, let the hose drip into a pan. One caliper can be rebuilt at a time but since each rebuilt caliper will require bleeding, rebuilding both fronts, both rears or all concurrently saves time.
07: Apply penetrant judiciously on both flare nuts. If the steel tubing is rusted inside the flare nut, it can twist during removal. A 3/8 inch flare nut wrench helps with these.
Note: as a general rule keep petroleum based products away from the insides of calipers because they can deteriorate some types of rubber.

08: Remove the sway bar link if so equipped for better access to the rear flare nut. Then remove the brake line for better access to the caliper mounting bolts.

09: Tip: break the two caliper bolts loose while the caliper is still bolted on. The torque spec on these is 130 ft. lbs. so a ½ inch breaker bar comes in handy. Also break the bleeders loose. There’s no need to remove the bleeder plugs. Zip offers new bleeders and plugs.

10: Pry off the dust covers once the caliper is removed and the two halves are separated. The covers and pistons come out easily.

11: The calipers can be cleaned inside and out by scrubbing with dish soap and water. It’s best not to use gas, kerosene or other petroleum based solvents. Make sure to blow any water from the passages or just let them dry thoroughly. If the calipers are to be painted, wipe them with acetone. This is especially important if silicone brake fluid was used or the paint will fish-eye.

12: Inspect the bores carefully. These had stainless steel sleeves installed many years and many miles ago. It’s OK if there are some wear marks as long as none will catch on a fingernail.
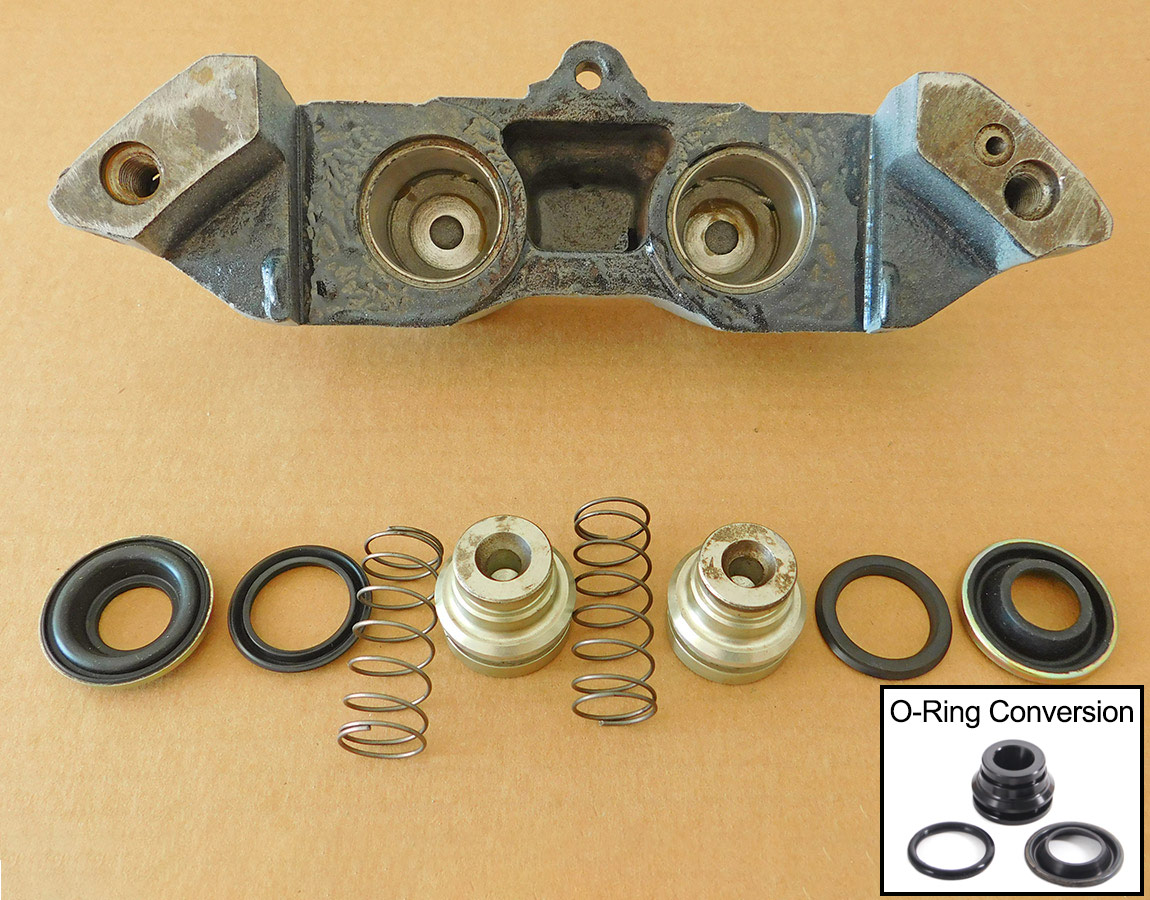
13: Zip offers both factory Lip Seal Caliper Rebuild Kits and upgraded O-Ring Design Conversions. Zip recommends that O-Ring design conversions should be used on Corvettes that are not driven on a regular basis because this design keeps the piston seal from becoming deformed over long periods of non-use. The lip seal caliper rebuild kits include dust covers, piston seals and the small O-Ring which goes between the caliper halves. The O-Ring conversion includes the updated design aluminum piston, dust boot and small O-Rings. We chose to go with the lip seal design for our caliper rebuild.

14: Make certain that the lip seal is properly positioned on the piston. The small shoulder to the rear of the seal is visible when the seal is fully seated against the piston. Apply a little brake fluid on the lip of the seal and on the caliper bore to aid installation.

15: Be patient installing the pistons into the caliper. It may be necessary to use a dull screw driver or similar item to gently push the seal lip into the bore. Then the dust cover can be tapped into its recess.

16: Install the brake pads and retaining pin and cotter pin into the caliper. These organic pads from Zip are similar to factory pads. They are a good choice because they are quiet, produce low brake dust and they’re easy on the rotors.

17: Tip: push the pistons into the caliper and slide a 15/16 or 1-inch socket between the pads. This makes it easy to install the caliper onto the rotor.

18: Reinstall the caliper mounting bolts. They are grade 8 shoulder bolts and have a thick lock washer. Torque to about 70 ft. lbs. – like a lug nut.

19: Reinstall the brake line. Tip: judiciously apply a little grease to the threads of the flair nut and its contact surface on the tubing end. This is especially useful on stainless steel lines which can require more force to seal against the caliper and brake hose.

20: Make sure the brake line does not extend over the trailing arm pad. That’s where the frame’s rubber bumper hits when the suspension is collapsed.

21: Bleed the brakes. If an assistant is not available, an inexpensive pressure bleeder is available from Zip. Tip: To make the lid fit even better for a Corvette dual master cylinder, drill ½ inch holes at the far ends of the aluminum plate. Then pop off the cover retaining clips and install the plate. Or simply use a large c-clamp on the plate.

22: Test for leaks. Dry any fluid around the flare nuts and bleeders. Then press very firmly on the brake pedal for 15 seconds or so a few times. Closely inspect the flare nuts and bleeders for any seeping. Wiping with a dry paper towel helps to spot leakage.

23: Install the wheels and the project is complete. When tightening lug nuts, it’s good practice to skip a nut and go around several times, even though there’s little chance of warping a Corvette rotor. Torque to about 70 to 80 ft lbs.
Tip: a piece of tape on a beam-type torque wrench makes it easy to see the target torque.
Optional Things to Do When Rebuilding or Installing Calipers

a. If the rotor is no longer riveted to the spindle, this is a good time to inspect or repair the parking brakes. Mark the relative alignment to the spindle before removing the rotor. Misaligning original rotors and spindles, or matched rotor and spindles, can increase rotor runout. Excessive rotor wobble can result in loss of braking when air is pumped into the caliper by the original style piston seals.

b. Inspect the lining on the parking brake shoes and test the adjuster and levers for free movement. Lubricate the levers and adjuster if necessary. This is also a good time to replace the parking brake cable if needed. Note that this parking brake system has very little holding power even when in perfect condition.

c. If new pads are being installed, some brake pad manufacturers recommend sanding the rotor surface to remove any glaze or embedded material left by the old pad. This is quickly and easily done with an orbital sander or by hand.

d. Replace the frame’s rubber bumper if it is deteriorated like this one was. Apply penetrant to the threads before removal. When installing the new bumper, getting the nut started onto the stud can be a challenge.
Tip: mark the nut at the position where its threads start, hold the nut with needle nose pliers and turn it a little to engage the threads.
1965-1982 Brake Caliper Rebuild and Replacement
Source: Zip Corvette Parts
8067 Fast Lane | Mechanicsville, VA 23111 | (800) 962-9632
Corvette Parts List Related to Article:
I would not recommend using visa grips to crimp the brake hose . Seen to many old brake hoses fall apart inside from crimping them. I like to disconnect the brake line from the hose and remove the hose with the caliper. Put a rubber plug on the brake line so I don’t lose to much fluid till I am ready to flush the system. Makes it easier to remove the front caliper also easier to flush out the old brake fluid. Great information on rebuilding the caliper, would have liked to see the new “O” ring style piston.
I have a ’68 Vette that needs steel inserts. This was not covered or described how to get them installed on the caliper or purchased.
Hi Tom,
Zip’s 1965-1982 Rebuilt Brake Caliper – O-Ring Seal and 1965-1982 Rebuilt Brake Caliper – Original Style “Lip” Seal feature stainless steel sleeves.
Thanks