
After at least 28 years of use a 63-67 Corvette instrument cluster has lost some of its luster. Gauge lenses are scratched or cracked, odometers quit working, indicator needles lose their color and even speedometer and tachometer mechanisms quit. How can you give the cluster that new look again? All you need to do is make a call to Zip Products, Inc., 8067 Fast Lane, Mechanicsville, VA 23111, (800) 962-9632. They have almost all of the gauges, mechanisms, lenses, needles and paint you will need to refurbish your instrument cluster. This rebuild will take a couple of weekends to accomplish but the results are well worth the effort.
Before you begin, there are a few bits of advice I would like to pass along. The instrument cluster rebuild will take a little more than your average do-it-yourself skills. If you have accomplished some of the more difficult rebuilds of your Corvette, then you will not have any trouble doing this one. If your extent of hands-on restoration is oil changes and minor tune-ups, I would suggest sending the complete instrument cluster to Zip where they can totally rebuild the unit for you. Another piece of advice is to make sure all of your gauges work properly before you start the rebuild. You do not want to totally restore the instrument cluster and then re-install it only to find out one of the gauges does not work. Zip can also help you here because they have most of the gauges available or can have your gauge rebuilt.
Now, let’s begin to give our project 64’s instrument cluster that face-lift it needs.

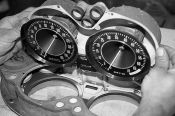
01: Here is our 64’s instrument cluster removed from the dash. Before you start, remember to disconnect the battery and follow your shop manual’s instructions for removal. You do have a shop manual, don’t you?

02: It is a good idea to make your self a diagram showing where everything goes. You would be surprised how easy it is to forget!
03: Start by removing the speedometer and tach assemblies. They are held in place by 1/4” hex screws and mounting tabs.

04: To remove the gauge assemblies, remove the mounting screws and then straighten the retaining tabs. Be very careful with these tabs. They will not take a lot of abuse.

05: Next remove the cluster illuminating bulb retaining plate.

06: The lens retaining plate should be removed now. Also, carefully remove the glass lenses and the small rubber lens anti-squeak pads. You will have to reuse these pads so be very careful with them. If they are deteriorated, we will show you how to make new ones.
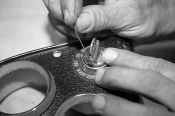
07: The lighter assembly and wiper and ignition switches should now be removed. To release the ignition lock cylinder and key, insert a straightened paper clip into the small hole in the cylinder cover. Turn the key to the lock position. Depress the paper clip and continue to turn the lock cylinder counter clockwise. Pressing down on the paper clip will spring a small release pin in the switch which will allow you to turn the cylinder beyond the lock position and pull it out of the switch. After the lock cylinder is removed, the switch can then be removed from the cluster.

08: All of the instrument cluster attaching pieces should now be removed. Use paint stripper to remove all of the old black and silver paint.

09: After the housing is thoroughly stripped, take some chrome polish and polish all of the chrome bezels. The 1964 bezels have a small chrome accent ring and the rest of the bezel was painted silver. To accomplish this, take some 1/8” masking tape and tape off the accent. Then use a scuff pad to rough up the area of each ring to be painted. Here you can also see that we taped off the chrome accent around the outside of the bezel as well as the indicators above each switch.

10: Now paint the entire cluster with the silver bezel paint. Make sure you get down into each bezel and switch area if yours had silver paint there.

11: This is one of the most time consuming steps to do. You will have to make shields to protect the silver painted bezels and switch areas. These shields cannot be taped to the housing so they have to fit and stay in place as you refinish the black. Remember to remove the tape over the switch indicators. These will be painted over in semi-gloss black. Use a semi-gloss black to repaint the cluster face. Be sure to get down between each shield to fully cover the instrument face. Remember, 3 or 4 light coats are much better than one heavy coat with runs.

12: After the paint is dry, carefully remove all of the masking tape. Use a straight edge razor blade across the tops of the letters of each switch indicator to remove the paint and expose the chrome lettering. Again, take your time. Patience is important here.

13: Disassemble the gauges from their retainers. When disassembling the speedometer and tach make sure you have all of the rubber insulators. These are very important. There should also be one on the inside of the housing between the mechanism and the housing.

14: Beadblast the backs of all of the housings, cluster retainers, screws, lens retainer and illuminating light retainer. You do this to remove years of discoloration, rust and scale.

15: Use Seymours Stainless Steel Paint or Detail Gray. Refinish all of the housings except the lens retainer plate. This should be painted low gloss or flat black.

16: To disassemble the tach, grasp the pointer between your thumb and forefinger. Turn the pointer counterclockwise while gently lifting up. The pointer should come off of the shaft. If the pointer and shaft turn freely, the speed cup is broken. Grasp the shaft with pliers and remove by the same procedure. To release the mechanism, remove the two 1/4” screws that hold the mechanism to the face.

17: Use a small brush to clean the gauges. A chip brush works very well. At present, there are no gauge faces available for the 63 and 64s so you will have to reuse the ones that you have. If they are dull, a mild polish will sometimes work. Try an inconspicuous spot before doing the entire gauge face. Also, do not rub across the numbers. Polish will sometimes remove them. If you have a 65 to 67, gauge faces are available.

18: Install the gauge face on the new mechanism. Look at the gauge and mechanism from the front. The large 1/4” round hole should be in the lower right corner. Make sure that you have adequate clearance (from a few thousandths to a 1/64”) between the copper colored cup on the back of the face and the small thrust washer on the shaft. Push in on the tach cable receiver and take up any slack in the assembly. Try to move the pointer shaft in and out to check clearance. If the proper clearance does not exist, you will have to move the copper cup. This is done with a small punch. By moving the cup insures that it is not distorted. Re-install the pointer by placing on the shaft at 12 o’clock. Push down and turn the pointer counterclockwise to zero. Increase pressure while turning to lock the pointer onto the shaft.

19: The speedometer needle and mechanism is removed the same as the tachometer. With the mechanism removed, spin the odometer gear. The odometer should spin freely. If it doesn’t, the problem is usually with the trip odometer.

20: Remove the two 1/4” screws that hold the trip odometer in place and lift out the mechanism. If the odometer now spins freely, the trouble is with the trip odometer. If not, the problem is with the whole assembly and it will all have to be replaced.

21: The problem we had was with the whole unit so we installed a new odometer, trip odometer, and an odometer worm gear. It is a good idea to use white lithium grease to lube all of the places where the odometer shafts ride. Also be sure to line up the retaining clips on the odometers when assembling them into the housing. Connect the trip odometer cable to the trip odometer and check its operation. The speedometer reassembles from here on the same as the tachometer so refer back to that procedure. You can now re-install the speedometer and tach into the housing. Remember to install the rubber insulators and the brake release, headlamp and high beam indicator lamp tubes. These cardboard tubes direct the light to the lenses on the instrument cluster face

22: If your gauges all work correctly and they are going to be re-used, you will have to clean them. This is done the same as the speed and tach only you will not remove the needles. The gauges must stay assembled so you will have to carefully clean around the needles. After they are clean, use a small paint brush and a paper towel and repaint the needles. You would be amazed at how nice bright needles will change the look of a gauge. Use one stroke to cover the needles. You do not want too much paint on the needle. Additional coats make the needle too heavy and may give inaccurate readings.

23: Re-install the gauge face rubber insulators. If they are missing, use small strips of black 3M Strip Putty. The Strip Putty will act as an insulator between the glass lenses and the housing.

24: Now carefully install the new glass gauge lenses and the lens retainer plate. Remember, do not touch the inside of the lenses because if you do, and you do not re-clean them, you will have fingerprints on the inside of the gauge which you will not be able to clean when it is assembled.

25: Re-install the housings onto the cluster. Remember to re-crimp all of the retaining tabs. Also remember to re-install all of the ground wire spades.

26: All of the switches can now be re-installed. The ignition switch lock cylinder is put into place and turned clockwise to lock it into place.

27: Here is the 64 instrument cluster with a complete facelift and ready to install.
Instrument Cluster Facelift: Restoring luster to your mid-year Corvette cluster
Source: Zip Corvette Parts
8067 Fast Lane | Mechanicsville, VA 23111 | (800) 962-9632