
The Corvette rear script or emblem, along with virtually all other decorative trim and insignias on Mid-Year Corvettes, is made of chrome-plated pot metal. Over time, due to exposure to moisture and the elements, the chrome plating develops pits and pocks as the pot metal underneath the plating reacts to changes in moisture content and air-borne chemicals. While replacing this script is a bit more involved then one would think at first blush, it’s easy enough to do with some simple tools and a couple of hours worth of labor. Here’s how to go about it with a new script from Zip Corvette Parts, 8067 Fast Lane, Mechanicsville, VA 23111, 1-800-692-9632.

01: Close examination of this original 1967 Corvette rear script reveals pitting and general weather wear. Additionally, this emblem caused an annoying rattle at idle speed due to vibration, since it wasn’t properly mounted; apparently, a previous owner of this car had removed it and didn’t replace it correctly.

02: It’s necessary to remove the rear valance panel so you’ll be able to reach upward for access to the script mounting nuts. The first step in removing the valance panel is to remove the nut, bolt and washers on the inside of each quarter panel that secure the lower end of the valance panel. Our project car has side exhausts; however, if your car has rear-exiting exhausts, it will be necessary to disconnect the muffler hangers from the mufflers so they can drop down for panel removal later.

03: A total of eight 7/16” bolts secure the valance panel at the rear of the car; 3 are located beneath each bumper, and these are removed next.

04: The rear license plate must be removed next for access to the two remaining 7/16” bolts located behind it.

05: The lower license plate bezel mounting bracket screws are removed next. When these are out, the valance panel can be removed by pulling down gently on it.

06: Here’s the rear of the car with the license plate and the valance panel removed. The stainless steel tray at the bottom is a magnetic unit that’s very handy for holding screws, bolts, washers and nuts that will be used again for reassembly. At this point, you can reach your arm up into the rear deck area next to the gas tank and use a 5/16” wrench to loosen the speed nuts holding the rear script on the car.

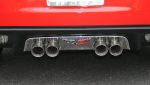
07: The old Corvette or emblem script is at the bottom with the new one at the top. The wear on the old one is evident when you compare it with the new genuine GM Restoration Part replacement unit.

08: The source of the vibration and rattle the old script (top) made is now evident when seen from the back; only two mounting spikes remained on the old one (at the bottom and top of the second “t” in Corvette), instead of all five required for a solid mount as shown on the new emblem (bottom).

09: Here’s the rear deck after removing the script, showing evidence that it was held on with butyl tape and glue. Shoddy workmanship by whoever did this, indeed!

10: It took quite a bit of scrubbing with a shop towel moistened with denatured alcohol and some gentle scraping with a single-edged razor blade to remove the gummy residue of the butyl tape and the dried glue, but it was necessary to clean the surface for proper mounting of the new script.

11: Along with the rear script, a speed nut kit was also ordered from Zip Products. Five of the smallest speed nuts are required for mounting the script, and they’re shown here positioned on the mounting spikes.

12: Use a 5/16” socket to thread the speed nuts all the way down on the spikes; this is necessary, since the speed nuts actually cut their own threads into the spike. Run each nut down and back up again about three times for each spike so the threads cut in nicely. This makes threading the speed nuts on considerably easier when you’re securing the script.

13: Position the script spikes over the holes in the deck and press down on the script evenly. Then reach your arm up inside the rear deck and thread each of the speed nuts on their respective spikes. When all 5 nuts are well started, use your other hand (or an assistant) to push down on the script while you tighten the nuts. You’ll find that a 5/16” gear wrench is the best tool to use for working in this very cramped area, since there really isn’t enough room to use a ratchet and socket. Here’s the new script installed and secured – quite a difference between how it looks now and how it looked when we started!
1963-1967 Corvette Rear Deck Emblem Installation: Corvette Rear Script Replacement
Source: Zip Corvette Parts
8067 Fast Lane | Mechanicsville, VA 23111 | (800) 962-9632
Corvette Parts List Related to Article:


Use the speed nuts with the rubber backing.