
If you are the owner of a 1984-1986 Corvette, you probably know that your “power” windows are anything but. Personally, I never knew power windows could be so slow, but this is just another flaw of the C4 Corvette. It wasn’t until mid-production in 1986 that Chevrolet recognized the problem and introduced a second design window regulator, which resembled the earlier Corvette regulators. So what do you do if your Corvette has the less powerful and unreliable first design window regulators? Simply replace them with a new regulator kit from Zip Corvette Parts, which will retrofit into the 1984 to early 1986 Corvettes and also serve as a replacement in late 1986 through 1996 Corvettes. In these kits you will find everything you need to convert your power window regulators, including directions. But before all of you Tim “The Tool Man” Taylors whip out your screwdrivers, carefully read through this article as we take an in-depth look at replacing your C4 Corvettes window regulators.

01: After lowering the window half-way, remove the door panel by removing several screws – two in the tray of the door pull, one directly in the center of the door-opening lever, several in the bottom carpet area of the door panel, and one on the back, just above the rear hatch-opening switch. For Corvettes with Bose stereo, remove the speaker grill attached with four Phillips head screws.

02: Once all of the screws are out, remove the lock slide by simply prying the end of the slide outwards with a flat-bladed screwdriver. With the slide removed, lock the door using the lock rod. Do not use the power door lock, as it will activate your alarm.

03: With your finger, push the lock rod toward the top of the door and push it out of the way of the plastic lock bezel.

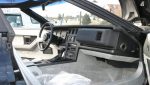
04: While carefully pulling up on your Corvette’s door panel, lift it off the door and disconnect the electrical connectors.

05: Our car did not have the vapor separating plastic attached to the door, but most will, so remove it from the retaining caulk to access the inner structure of the door. Use a 7mm socket to remove all of the screws around the outside edge of the aluminum brace. Then use a 10mm socket to remove the bolts that hold the brace to the window regulator (at the bottom of the brace) and the window stop (at the top rear of the brace).

06: Remove the power lock rod located at the back of the brace by pushing the rod out of the plastic lock that holds it to the swivel. You might have to use a little force because the lock can be stubborn.

07: To get the brace out of your Corvettes door, pull up and out. It is flimsy, so don’t worry about bending it; you won’t permanently damage it. Once it is out, just let it hang out of the way. No need to remove totally.

08: Remove your Corvette’s widow three nuts that hold the window glass to the regulator using a 10mm socket. Then remove the glass from the regulator and pull it all the way up to the top of the door. You will need a pair of rubber clamps to hold the window in place.

09: Remove your Corvette’s window regulator by removing the five attaching bolts, two at the top of the door, two at the bottom, and one in the side. Also unplug the electrical connector on the power window motor. You will have to rock the regulator backwards to get it out. On Corvettes with Bose, you will have to use some force to remove it, but be careful not to hurt the Bose amplifier.

10: The hardest part of the job is drilling the mounting holes for the new regulator. Measuring from the rear oval hole that the original regulator was bolted into (almost in the bottom center of the door), carefully measure back toward the rear of the door 143mm from the center of the oval hole. Mark this spot and make sure that it is centered, then drill a ¼-inch hole. From the center of the hole you just drilled, measure back another 78mm and drill another hole. Now take the rubber block that was supplied with the regulator and install it in the oval to serve as the new lower window stop. Finally, shorten the center window glass stud about ¼-inch, or you can install the new one that is provided with the new regulator.

11: Now install the new window regulator, inserting it at an angle and then rocking it forward into position. Secure your Corvette’s new window regulator with the new bolts and bolt the glass back to the new regulator. Try to line the window up best as possible to its original position.

12: Now comes the electrical part. Unwrap the part of the harness with the power window connector all the way to where it meets the rest of the harness. The added length will allow the connector to reach the new power window motor location. On the passenger side, switch the polarities in the connector by lifting up on the top of the connector tab, then insert a safety pin or use a connector tool into the end of the connector to depress the locking tabs. With the tabs depressed, carefully pull on the wire until the terminal comes out of the connector. Do this for both wires and them reinsert them into the opposite connector. Then just simply plug the connector into the switch. Now you can reinstall the aluminum brace, then unlock your door and close it. If the glass does not align properly, loosen the window nuts and adjust the window. Once the glass fits where you want it, reassemble your door in the reverse order you took it apart.
Installing the Power Window Regulator: 1984-1996 Corvette Power Window Regulator Upgrade & Install
Source: Zip Corvette Parts
8067 Fast Lane | Mechanicsville, VA 23111 | (800) 962-9632
Corvette Parts List Related to Article:

Thanks for posting this article!!!!